 How to make a ring. A Pictorial. A How-To by Nicole Isaacs. This is definitely worth a look, especially if you make jewellery and things don't always turn out quite the way you'd planned. There's a twist in the tail, so make sure you view all the steps right through to the end!
Thursday 27 September 2007
A familiar ring?
 How to make a ring. A Pictorial. A How-To by Nicole Isaacs. This is definitely worth a look, especially if you make jewellery and things don't always turn out quite the way you'd planned. There's a twist in the tail, so make sure you view all the steps right through to the end!
Tuesday 25 September 2007
Patina blues
There's a project by Jane Konkel in the November 2007 issue of Bead Style magazine, which involves adding a blue patina to a copper chain. The photos show a really pretty Winsor Blue result. The instructions were simple, and a web search produced this resource with supporting information, so I decided to have a go. Although the pieces in the article have textured surfaces, I tried the technique out first on a set of smooth wire chain maille earrings I made last year, as they were nice and small.
 First step is to soak the copper in salty water, about 2 tablespoons in 150 ml. I left them for 8 hours which is the upper limit of the recommended period given in the magazine.
 Next, you need to place the copper in an atmosphere of ammonia fumes. This can be done in a lidded container, with the items suspended above a centimetre or so of ammonia before sealing. Alternatively, sit an open container of ammonia on your worktop, place the copper item beside it and cover both with a lid to hold in the fumes. I made up an arrangement using an upside down glass jar, so that I'd be able to see what was happening without removing the lid. The ammonia to use is household ammonia, which is 9.5% ammonia. I got mine in a local hardware shop. So, I took my salty earrings, suspended them above the ammonia, and retired to bed. The magazine suggests that a period of four to ten hours would be suitable: mine were left overnight for ten hours.
 And this is the result, which is rather towards the tarnish end of the patina-tarnish spectrum! The final step would be to spray with a protective acrylic coating, but I haven't done this as the finish isn't really worth protecting, and I may clean it off and try again.
There are clearly lots of variables involved here: cleaning, surface finish, how the salt is applied and how long you expose to the fumes. Worth another go!
 First step is to soak the copper in salty water, about 2 tablespoons in 150 ml. I left them for 8 hours which is the upper limit of the recommended period given in the magazine.
 Next, you need to place the copper in an atmosphere of ammonia fumes. This can be done in a lidded container, with the items suspended above a centimetre or so of ammonia before sealing. Alternatively, sit an open container of ammonia on your worktop, place the copper item beside it and cover both with a lid to hold in the fumes. I made up an arrangement using an upside down glass jar, so that I'd be able to see what was happening without removing the lid. The ammonia to use is household ammonia, which is 9.5% ammonia. I got mine in a local hardware shop. So, I took my salty earrings, suspended them above the ammonia, and retired to bed. The magazine suggests that a period of four to ten hours would be suitable: mine were left overnight for ten hours.
 And this is the result, which is rather towards the tarnish end of the patina-tarnish spectrum! The final step would be to spray with a protective acrylic coating, but I haven't done this as the finish isn't really worth protecting, and I may clean it off and try again.
 There are clearly lots of variables involved here: cleaning, surface finish, how the salt is applied and how long you expose to the fumes. Worth another go!
Monday 24 September 2007
Sea/Beach glass jewellery: three websites

Relish Inc (http://www.relishinc.com/jewelry.htm). Jennifer Reed and Terri Reed-Boyer use pieces of genuine found Lake Erie beach glass to create their jewelry.
Sea Glass Jewellery by Gina Cowen (http://www.seaglass.co.uk/default.cfm). Glass from all over the world is used by this artist, who describes the glass as "tide-tossed luminous pebbles of colour"
Lisa Hall Jewelry (http://www.lisahalljewelry.com/seaglass.html). The Cranberry Island beaches in Maine are the source for the lovely sea glass in this range of jewelry.
Saturday 22 September 2007
Acrylic earrings
 Earlier this year, as part of the Level 2 Colour project in the class, I did some preliminary experiments using acrylic. I was motivated by the glorious results produced by experts: see my earlier post for links to three websites.
 The starting point for the earrings was a 10 mm diameter clear acrylic rod. I cut two slices (each about 4 mm thick) from this using a piercing saw. Wet and dry paper (used wet) of grades 600 and 800 was then used to smooth the cut faces, and reduce the thickness of each slice to 3 mm. The cut faces were still matt at this stage, and polishing grade paper was used to regain their transparency.
 Acrylic paint was applied to one polished face, in layers. Two coats of varnish (I used polymer clay varnish) were applied on top of the paint. Finally, a silver earring post was glued to the back with two part epoxy glue. It seemed likely that the layers would be ripped apart when the earring backs were pulled on and off the posts, but this hasn't happened yet (4 months).
I very much like the way the light enters the acrylic through the sides as well as through the front face, making the paint take on a glow. I shall definitely be using acrylic again. A larger picture is on flickr.
Thursday 20 September 2007
Felt earrings with dots and stripes
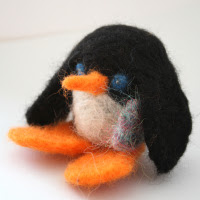 No! No! This little chap isn't an earring. He's here to illustrate how I learned how to needle felt. I bought a kit from Twist Fibre Craft Studio at Woolfest. The kit was a great way to start, with all the necessary bits and pieces to make a penguin family and clear instructions.
I then moved on to make balls by needle felting, adding a design once the shape was well formed. The balls were finished off by wet felting to make them nice and hard. It isn't very easy to control a pattern when wet felting the ball from the start, but using both methods seems to work well.
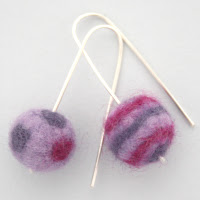 These earrings were made from some of my first little balls, which are about 15 mm in diameter. Each one has a different pattern because I was trying things out, but I rather like them as a non-matching pair. The wires are silver and the drop 35 mm.
I won a blog giveaway!
 The wonderful Sew Mama Sew Blog runs a regular Free Fabric Friday competition. Recently, I was one of the lucky winners of a yard of fabric of my choice! It was hard to choose as there are so many lovely designs, but I'm very pleased with what I decided on. It is Lily Espresso ~ Manzanita by Joel Dewberry. I'll let you know what I make with it.
Monday 17 September 2007
Jewellery Design from the Scottish Parliament
 I discovered this resource on the Scottish Parliament website! Go to the page entitled Using the Scottish Parliament in the Art and Design Curriculum, then select the link Jewellery Design (pdf 473KB posted 18.01.06). This will return a pdf document, which is a lesson plan for school teachers about designing jewellery using the Parliament buildings as inspiration. However, the attractive content will be inspiring to others too. The pattern here is one I created very quickly by following the instructions. There are better examples in the document, which look as if they would be good for etching.
Saturday 15 September 2007
Acrylic jewellery: three websites

Michael Peckitt - Very Colourful Jewellery (http://www.michaelpeckitt.com/). This jewellery really has the WOW factor!
Sarah Packington (http://www.sarahpackingtonjewellery.co.uk/). Stunning effects achieved with small amounts of colour.
Gail Klevan (http://www.gailklevan.com/). Richly decorated and pleasingly shaped designs.
Wednesday 12 September 2007
Polymer clay, what shall I do next?

 This bracelet and these earrings include examples of my handmade polymer clay beads. They were made outside of the evening class as they are bead stringing projects that do not use any of the techniques covered in the class. In the next year, I am thinking about making a piece in class, using stone setting methods to mount a polymer clay cabochon. This will probably be a brooch. A lovely example by Grace Stokes appeared recently on the cover of Art Jewelry magazine (September 2007).
Subscribe to:
Posts (Atom)

