Sunday 29 June 2008

Liver of sulphur follow up

I was really excited by the results of my first experiments with liver of sulphur (sulfur). Here's an update.

The ring had a good thick layer on it. I rubbed it away in places when trying to make the non-black parts shinier, but I was happy with the effect. I sprayed the ring with acrylic spray coating (mine is made by Humbrol), applying a total of about 5 thin coats. The ring is shown post-coating in this post.

Unfortunately the thin layer on the fold-formed piece, which had the lovely colours, was not very robust. It soon began to fade, and lost more of its allure when I used Silvo to clean off the ear wire. My plan now is to clean the whole earring and try using the liver of sulphur again. This time if I get a nice effect I shall spray with the acrylic coating at once!

Wednesday 25 June 2008

The beginning of the middle


In my last post I explained how my three years of evening classes have now come to an end: the end of the beginning. Now I have to start a new phase, one that can perhaps be called the beginning of the middle! I've had a few thoughts about how to provide some structure to my jewellery making activity in the absence of a weekly class:

* Prepare a list of techniques to try, and then select perhaps two or three to attempt in a year

* Write my own briefs. These will lack the assessment criteria that were included in the real ones, but will include well defined targets so that it is clear I've done what I set out to do. The aim would be to prepare a brief long before following it, to avoid writing a brief to fit with something I've already thought about too much!

* Prepare mood boards, colour collages and other design aids, ideally as part of an Internet workalong, where others are engaged in the same task. Is anyone aware of anything like this going on?

* Enter competitions and challenges

* Prepare online tutorials for the blog and investigate the feasibility of submitting a project tutorial to a magazine.

* Attend the odd workshop

Can anyone offer any more suggestions or experiences?

Saturday 21 June 2008

The end of the beginning

Display cases at end of year exhibition for OCN jewellery classes

My contribution to the display.


I have now attended the last class of the three year OCN (Open College Network) course. The time has gone very quickly. I have learned a great deal, and my approach to jewellery making has certainly matured - I shall be reflecting on this in a future post.

The college I attended has had to respond over the years to changes in the way in which government funding is made available for adult education. Such funding reduces the cost to the student. The OCN class I attended involved quite a lot of assessment because it was a requirement for continued funding. The assessment suited me rather well, as I like to document my progress (hence this blog!), but for many people the emphasis on assessment meant that there was less time for the practice that is essential when learning. More changes mean that this year was the last one that the OCN course was run, so I feel very lucky to have completed my three years just in time. In future, the college will be running more expensive, but less assessed, courses instead.

I called this post "The end of the beginning" because for me the classes represented the foundations of what will be a longer period of activity. I intend to keep designing and making jewellery, but recognise that I will need to set myself tasks and targets, as it would be very easy to stop without the structure provided by weekly classes.

Wednesday 18 June 2008

Ripple earrings v2.0

I love my double ripple earrings, but they are just a bit big and dangly for me to consider them for everyday wear. This latest pair is slightly less flamboyant, with only one, smaller ripple on each earring. The total drop is 4.5 cm (1.75"), and the ripples themselves measure about 25 mm by 12 mm ( 1" x 0.5"). The ripples are made from 1.3 mm diameter silver wire. Because this wire is thicker than the 1 mm wire I was using before, it was possible to replace the hanging loop with a drilled hole. The wire was hammered flat and the hole drilled using a 1 mm drill bit.

One of my classmates gave me a really good tip for using such a fine drill. He shortens the shaft by holding the bit in two pairs of pliers and twisting so that it breaks. The bit can then be put in the chuck with only a short (e.g. 1 cm) length sticking out. It is much easier to control and doesn't go all wobbly in use!


There was only one solder join to make on each ripple, and I managed to make the joins quite neatly. The ripples were forged, and finished using 600 grit wet and dry paper, followed by a 20 minute tumble polish.

Monday 16 June 2008

Ripple poll: vote for your favourite Ripple


I've set up a new online poll - you can see it in the sidebar on the right of this blog, just below the introductory bit. Please vote in the poll to let me know which of the three Ripple pieces you like the best! There are full size pictures of each of the pieces in this post. The poll will be open until 11 August 2008, but please cast your vote soon. I take great delight in seeing the votes come in!

Sunday 15 June 2008

Stone set ripple

This scrap of silver sheet carries echoes of previous work. The jigsaw bump (promontory? tab?) came from a very unsuccessful brooch. The silver from inside that polygon went on to be the back of my penannular bottle glass brooch. I've now used some of the remaining sheet for two bezel settings. The smaller one is for my puffin pendant. The other one is for a stone set ripple pendant.


I soldered the finished bezel setting to the very first ripple I made.


Then set the stone, which is 8 mm in diameter. The ripple is 45 mm long. This photo was taken after the first few pushes of the pusher.


I had taken more care to ensure that the top of the bezel was flat this time, and I think the setting is neater than my earlier efforts. This is a pleasing result, and I may try again with thicker wire. I think that it fits in well with the rest of the Ripple Suite.

Friday 13 June 2008

The Ripple Suite: Complete

Double ripple earrings and bracelet


Ripple band ring with liver of sulphur (sulfur) patina. It is 5 mm wide.


Double ripple earrings (again)

And the inspirational photo.


The work in progress posts: 7, 8, 9, 10, 11,
The design posts: 1, 2, 3, 4, 5, 6

Thursday 12 June 2008

What do *you* see?

There's a little stick figure man in there (his head is where the two small ripples overlap) - see him? There's also a hint of two pregnant ladies, with tiny heads ...

Saturday 7 June 2008

First adventures with liver of sulphur


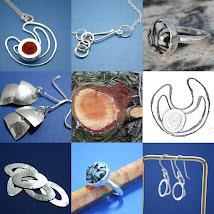
I am amazed at my success with applying a liver of sulphur/sulfur patina to one of my fold formed earrings. I would have been happy with black, but getting lovely colours was quite a bonus! Whether I shall be able to repeat this is, of course, quite another thing.
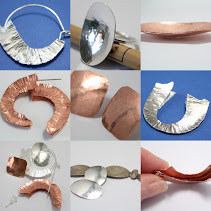
I started with the ripple band ring. I scrubbed it with soap and water, then applied pumice powder using a glass brush.


I used liquid liver of sulphur, sold by an art clay supplier who supplied it in the little bottle shown here. I added the liquid to hot tap water in the tub on the right. The red liquid came out of the bottle in a little glug rather than drops, but there were probably 10 drops or so. The ring was suspended from a thread and submerged for about 30 seconds.


This is how the ring looked after rinsing. I sanded the surface of the ripples with 600 grit wet and dry paper, but thought that the oxidation wasn't dark enough, so dipped the ring for a further half minute.


Here's the ring after its second dunk, and after sanding the ripples and the edges to remove the oxidation there. I'm pretty pleased with it.


Then I found my fold-formed earrings. I decided just to try the nicer one, which has more regular surface indentations. This time I didn't use any pumice powder, but just scrubbed the earring with soap and water, then rinsed and dried it. It took much longer for a colour change to take place this time, perhaps because the solution had cooled down, or because there was soap or grease left on the surface. The inside of the shape (which hadn't been scrubbed) turned black first.


When the silver had turned a copper-like colour, I removed it from the liver of sulphur, rinsed it and used wet and dry paper on the surface. Then I returned it to the solution for a couple of minutes, before rinsing and sanding again.


And this was the result.

Wednesday 4 June 2008

Progress with Ripple pieces

The bracelet has been tumble polished and is now completed. The main section is 16 cm (6.25") long

The double ripple earrings (in silver, based on this copper test piece) need more tumbling, and perhaps a little shape tweaking. The two shapes are arranged slightly differently from the prototype, as they look better that way in this case!


The band ring is coming along. I have shaped the flat strip (seen in this post) into a ring. I've done some filing and sanding, but it still needs to be tidied up considerably. I think that this ring may become my first experiment with liver of sulphur.

Monday 2 June 2008

Ripple band ring started

The ripple band ring, which will be part of my Ripple suite (with earrings and bracelet), will be made from 1 mm thick silver sheet, decorated with little ripples made from 0.6 mm wire. I've made a start on this.

Each mini-ripple was made from a 6 mm diameter ring of wire. These differ a little from my other ripples as there is no loop, and I cut off a little bit of wire after shaping each.


I spent a lot of time on fixing the ripples to the silver sheet, because it took a long time to work out how best to do it. I started out trying to solder all six ripples at once. None of them joined to the sheet, and the end of the wire balled on a couple of the ripples.


My next attempt was to fuse the ripples, as they heated up very quickly. I tried just one ripple, and although the wire looked very hot and liquid, it didn't attach. I decided this was not the time to do my first fusing project after all.

The next change was to hammer the ripples flat, and solder just one at a time. I finally had some success here, but success was strongly related to how I was supporting the sheet. I had to give up on a couple of runs as I was heating the sheet, my tweezers and the soldering block, and just couldn't raise the temperature high enough with my little butane torch. Holding the sheet above the block with the tweezers covering just a tiny bit of metal in a distant corner was the best approach. I suspect if I had been at the class with access to a bigger torch, this would have simply changed, rather than solved, my problems. I would have had melting crises instead!


Before taking the piece to the class to finish, I have cut the silver the right width and length. The surface finish is going to need some work.

Sunday 1 June 2008

Steel block

In the course of my non-jewellery making life, I was given this steel block. It was one of several being used in a project, but they had some left over so I asked if I could have one. It measures 5 cm x 5 cm x 1.9 cm (2" x 2" x 0.75"). I think it will be very useful for hammering, but I'll need to polish the surface first.