Wednesday, 30 April 2008

Metal inlay jewellery: three websites


Shelby Fitzpatrick (http://www.shelbyfitzpatrick.com). This lovely example has 22ct gold inlaid in sterling silver.

Will Evans has a range of inlaid pieces, these rings are 18ct white gold inlaid with fine gold. Also at Dazzle.

Beccy Gillat. My interest in metal inlay was aroused by seeing pieces by Beccy Gillat at the Yorkshire Sculpture Park shop. She uses stainless steel inlaid with 18ct gold. Unfortunately I haven't been able to find any pictures of her work on the Web to link to: can anyone help?

Sunday, 27 April 2008

Setting another polymer clay cabochon

I need a bit more practice with making bezel settings. I am getting much better at the first steps, but am not happy with the results of using the pusher and burnisher. The final result looks crinkly and unprofessional. So I'm setting another polymer clay cabochon that I made a year or so ago.


The cabochon is identical in shape and size to the one featured before because I used the same mould to make it (pictured). I think I bought mine from here. The cabochons are relatively easy to make following the instructions that come with the mould. Most of the effort goes into the finishing using various grades of wet and dry paper (used wet).


Here are four pictures taken during the setting process.The first three are in the phase when using the pusher, the last one (bottom right) is after some work with the burnisher. I am finding these photos very useful. They show up irregularities that I don't notice by eye - that little notch on the right hand side for example. I should have removed it before stating to push the bezel.

Saturday, 26 April 2008

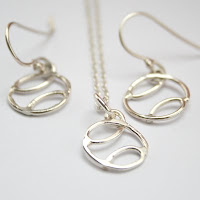
and now there are three

I made a little pendant to go with the earrings I made earlier. This shape is the baseball design on p81 of Creative Silver Chains by Chantal Lise Saunders, but with one of the loops removed. The circles are about 1 cm across.

Wednesday, 23 April 2008

Starting to ripple

I made my first ripple! Based on one of the sketches shown in this post. It is about 4 cm long. I was reasonably pleased with it, so I've taken a few steps back and am now working out how to make them properly.


The first step was to get some copper wire to experiment with. I wanted to make a set of shapes at different sizes to decide which aspect ratio (shape size to wire thickness) I liked best. The copper wire was much softer than the silver, and I had trouble making smooth curves.


So, taking another step back I decided to work on developing a method to make the shapes reproducibly and without too many kinks. I made good progress with that. The shapes link together well too, so I'll keep going with this idea.


As I work on this, the shapes will probably move away from the original inspiration seen in this photo.

Friday, 18 April 2008

Bezel setting videos


There's a whole series of videos on bezel setting at the Art Jewelry magazine website. I'm sure there were just three the other day and now there are eight! Making a Bezel comes in five parts: Measuring, Soldering, Shaping, Adjusting Size and Soldering to a Backplate. Setting a Cabochon in a Bezel has three parts: Ajusting Bezel Height, Using a Bezel Pusher and Using a Burnisher.

I've only viewed the one on using a bezel pusher so far, but found it very clear. You need to register (free) to view the videos.

These are well worth a look. The links are listed under the Metalsmithing heading on this page.

Monday, 14 April 2008

Preliminary designs from Coast theme materials


I have started to makes some preliminary sketches for jewellery designs based on the photos collected as part of my Coast theme design project. So far I have extracted some pleasing shapes from photos of ripples in the sand (left) and puffins (below).


I have already got some promising shapes, but I do need to go through the process of trying variations on the shapes, and also to think about scale.

Saturday, 12 April 2008

Review - Brief number 2: Combining techniques

Image created using Picasa and the Hockneyizer.

The second brief at Level 3 of my course was introduced in this post.

A list of seven techniques was given, and we were asked to design a piece of jewellery that used at least two of the techniques. I had to exclude two because I hadn't been very successful with them in previous efforts (repousse and enamelling) and two because I hadn't yet tried them for myself (casting and using a variety of metals). This left forming, mixed media and stone setting.

My final piece, the tree ring and felt design, included mixed media and stone setting techniques. Although the piece isn't a particularly dramatic combination of two advanced techniques, I'm pleased with it. One of my aims with this brief was to move beyond producing beginner pieces and to try and make something that was the product of a documented design process. In this respect at least, I have succeeded!

Thursday, 10 April 2008

Finished at last! Tree ring and felt design

I am pleased to report the completion of this piece!

Things I like about it: The holder for the felt. I like the way it looks. The felt slice was easy to insert, fits snugly and looks smart. The shape of the rings. That it is the first thing I’ve made that really was inspired by a photo.

Things I would change: The rings should be thicker. The flattening of the square wire was necessary to disguise mishaps. It would have been good to retain the square shape.

This is the clasp I made. The chain is purchased, and I suspect it is too delicate. I'm pleased with the rings made with square wire.

Side view!

The inspirational photo

And the design drawing

Finally, here’s a list of the previous posts about this design:
Design phase: 1 2 3 4
Building phase: 5 6 7 8

Tuesday, 8 April 2008

Jewellery with a sense of place: three websites


Diane Archer (www.dianearcher.com). Jewelry, featuring etched maps and found objects, which explores emotional and physical aspects of place.

Anna Lindsay Macdonald (www.annalindsay.com/work). Striking, lacelike metalwork based on the grid street patterns from maps of Toronto and Halifax.

Caroline Branchu
Jewellery designs that incorporate tiny photographs taken in Glasgow and around Scotland. (www.saatchi-gallery.co.uk/yourgallery/artist_profile/Caroline Branchu/11603.html).

Saturday, 5 April 2008

Tree ring design another update

I am making good progress with this piece. I made my usual mistakes, and melted the wire when soldering. A little work is still required to neaten the shape up after this, and I shall texture the wire further to hide the mishaps. The holder for the felt seems to have worked well.

It was originally going to be a brooch, but is now going to be a pendant. This is partly because of practical issues associated with fastening a brooch, and partly because I am less likely to wear a brooch.


For earlier WIP posts about this piece, see here, here and here

Friday, 4 April 2008

More from Creative Silver Chains


Made following instructions in Creative Silver Chains by Chantal Lise Saunders.